I have been wanting to make this tutorial for a while now. When I started using Adobe Illustrator I didn't take a tablet for about 5 months and I thought this meant I had to avoid certain things similar using paintbrushes and hulk brushes. I likewise felt like I was missing out on some of the features that tablets take to offer such every bit pressure level sensitive pens but as soon as I got my tablet I realized I was wrong. The absurd thing about Illustrator is it actually has features congenital in that on a bones level volition accomplish a similar effect to a tablet, and that is what I want to discuss here.
Then permit'south go started!
Changing Brush Options
If you double click on either the paintbrush, blob brush, or pencil tool, Illustrator will open up up an options box filled with all of the unlike features of each tool.
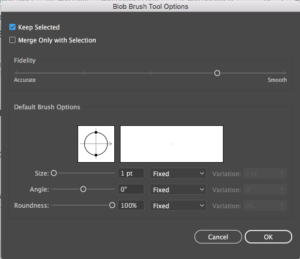
Using the blob brush options equally an example, change the allegiance of the brush. Usually your brush will start out in the center of accurate and smooth, however, y'all desire your brush to exist closer to smooth. I like to move the fidelity one place over in between the heart line and smooth considering information technology will shine out the kinks that are caused past shaky easily. This will give you straighter lines without much attempt, similar to what would happen if y'all accept a tablet. If you program on using the pencil tool, I would suggest moving the Allegiance all the way to smooth. The reason I don't suggest you move the fidelity of the blob brush tool all the style to shine is when y'all get to make corners Illustrator will sometimes round the corners in a rather haphazard way. While this nonetheless happens with the less polish fidelity, information technology doesn't happen as ofttimes.
Using the Smoothen Tool
Changing the fidelity of your brushes volition significantly subtract the amount of work you will have to do later, merely sometimes that isn't enough. If your lines still have kinks in them you tin go back in with the smooth tool and polish out those lines. To employ the smooth tool yous have to select the path you want to smooth first. You tin can find the polish tool underneath the sharper tool that looks like this:
![]()
To select the shine tool click/concur down on the sharper tool and scroll down to the smooth tool.
The Width Tool
If y'all have a tablet you will probably exist well aware of the magic of being able to employ a force per unit area sensitive pen. Without a tablet, Illustrator does not have this function, but yous tin can still create a similar look to the pressure sensitive pen past using the width tool. The width tool works with paths and allows y'all to make certain parts of a path thicker or thinner depending on your desired look. Take these squares for case:
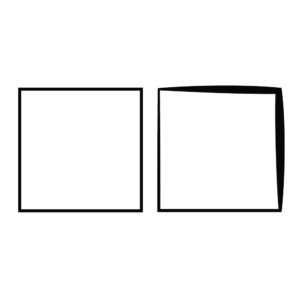 The left square is a normal square without any variation in its lines. On the right square, I used the width tool to thicken the top and right lines on the box. To use the width tool, select the width tool in your left side toolbar. The width tool looks something like this:
![]()
Select the object you wish to manipulate (in this case the foursquare) and drag out the portion of the path that you wish to thicken. And then let'southward compare what something would actually look similar with and without using the width tool.
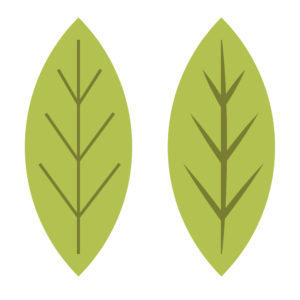
The veins in the left leaf are a plain one-time path. The veins in the right leaf were manipulated using the width tool and give information technology a piddling more dimension than your regular path.
Changing a Paths' Contour
If yous don't want to bother with the width tool, there is a much simpler option for creating variated lines in Illustrator and that can exist plant in the stroke console. If you don't know where the stroke panel is the easiest way to observe it is by going to window in the meridian carte du jour and scrolling down to stroke. This should bring up a panel that looks similar this:
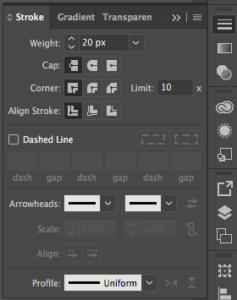
At the bottom of the panel, in that location is a box that says profile. Click that box to betrayal a drop-down menu.
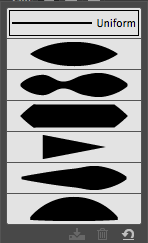
These are all of the options that Illustrator has that tin can affect the shape of your paths. If yous notice, some of the options are directional so for example, the option shaped like a triangle is thick on i side and thin on the other. When applied to a path it looks something like this:

If you want to opposite the management of the thickness of that path Illustrator has an option for this which you can find to the right of the profile box in the stroke console. The fiddling icons look like ii triangles facing each other and volition exist available depending on which profile option you lot choose.
![]()
These are just a few Illustrator options that will help you lot in Illustrator when you don't have a tablet. I think either adjacent Monday or the Monday later on I want to do another tablet post about what I wish I knew before I got a design tablet so if yous would be interested seeing that let me know.
What are some of your favorite Illustrator tips for those who don't have a tablet?
If you lot liked this post, why not share it! It lets me know what posts you like so I can brand more posts like this.
Shop My Designs
Save Save
Save Save
Save Save Relieve Save Save Save
Save Relieve
Save Save
Save Salvage
Save Save
Relieve Save Save Save
Save Save
Salve Save
DOWNLOAD HERE
How to Draw in Illustrator Without a Tablet TUTORIAL
Posted by: teresahoce1945.blogspot.com


Kommentare
Kommentar veröffentlichen